Develop Web App
In this section we will develop a web app with a search interface to search the documents. We will now work on the web app in the Cloud9 workspace we have created.
Prepare the environment
- Make sure you are in the defult directory in a Cloud9 terminal window (~/environment) and then use the following command to download the code for the Kendra sample app and extract it in a temporary directory using the following commands.
mkdir tmp
cd tmp
curl "https://d3v65tjf58jeni.cloudfront.net/kendrasamples.tgz" -o kendrasamples.tgz
tar zxvf kendrasamples.tgz
cd ..
- We will build our app in ReactJS. Create a ReactJS app using the following command:
echo fs.inotify.max_user_watches=524288 | sudo tee -a /etc/sysctl.conf && sudo sysctl -p
npx create-react-app kendra-poc --template typescript
- Change the working directory to kendra-poc and ensure that you are in the /home/ec2-user/environment/kendra-poc directory
cd kendra-poc
pwd
- Copy the source code to src directory using:
cp -r ../tmp/kendrasamples/* src/
mv src/index.tsx src/index.js
- Install a few prerequisites by running:
npm install typescript node-sass@4.14.1 @types/lodash semantic-ui-react rc-slider@9.2.4 @types/rc-slider react-google-charts moment --save
npm install @aws-amplify/cli @aws-amplify/ui-react aws-amplify --save
npm install aws-sdk bootstrap react-bootstrap --save
npm install -g @aws-amplify/cli
Initialize Amplify
1 On the commandline, in the kendra-poc directory run
amplify init
- Press Enter to accept the default project name kendrapoc Enter dev for the environment name Select None for the default editor (we are using Cloud9) Choose JavaScript and React when prompted Accept the default values for paths and build commands Select the default profile when prompted Your run will look like:
admin:~/environment/kendra-poc (master) $ amplify init
Scanning for plugins...
Plugin scan successful
Note: It is recommended to run this command from the root of your app directory
? Enter a name for the project kendrapoc
? Enter a name for the environment dev
? Choose your default editor: None
? Choose the type of app that you're building javascript
Please tell us about your project
? What javascript framework are you using react
? Source Directory Path:  src
? Distribution Directory Path: build
? Build Command:  npm run-script build
? Start Command: npm run-script start
Using default provider  awscloudformation

For more information on AWS Profiles, see:
https://docs.aws.amazon.com/cli/latest/userguide/cli-multiple-profiles.html

? Do you want to use an AWS profile? Yes
? Please choose the profile you want to use default
Add Authentication
- To add authentication to the app run
amplify add auth
- Select Default Configuration when asked if you would like to use the default authentication and security configuration
- Select Username when asked how you want users to sign in
- Select No, I am done. when asked about advanced settings.
- This session will look like:
Using service: Cognito, provided by: awscloudformation

 The current configured provider is Amazon Cognito.

 Do you want to use the default authentication and security configuration? Default configuration
 Warning: you will not be able to edit these selections.
 How do you want users to be able to sign in? Username
 Do you want to configure advanced settings? No, I am done.
Successfully added resource kendrapocd377863f locally
- To create these changes in the cloud run
amplify push
- Confirm you want Amplify to make changes in the cloud for you.
- Wait for the provisioning to complete. This will take a few minutes.
Info: The Amplify CLI will take care of provisioning the appropriate cloud resources and it will update src/aws-exports.js with all of the configuration data we need to be able to use the cloud resources in our app.
Tip: Amazon Cognito lets you add user sign-up, sign-in, and access control to your web and mobile apps quickly and easily. We just made a User Pool, which is a secure user directory that will let our users sign in with the username and password pair they create during registration. Amazon Cognito (and the Amplify CLI) also supports configuring sign-in with social identity providers, such as Facebook, Google, and Amazon, and enterprise identity providers via SAML 2.0. If you would like to learn more, we have a lot more information on the Amazon Cognito Developer Resources page as well as the AWS Amplify Authentication documentation.
Configure IAM Role for to assume Temporary Credentials
-
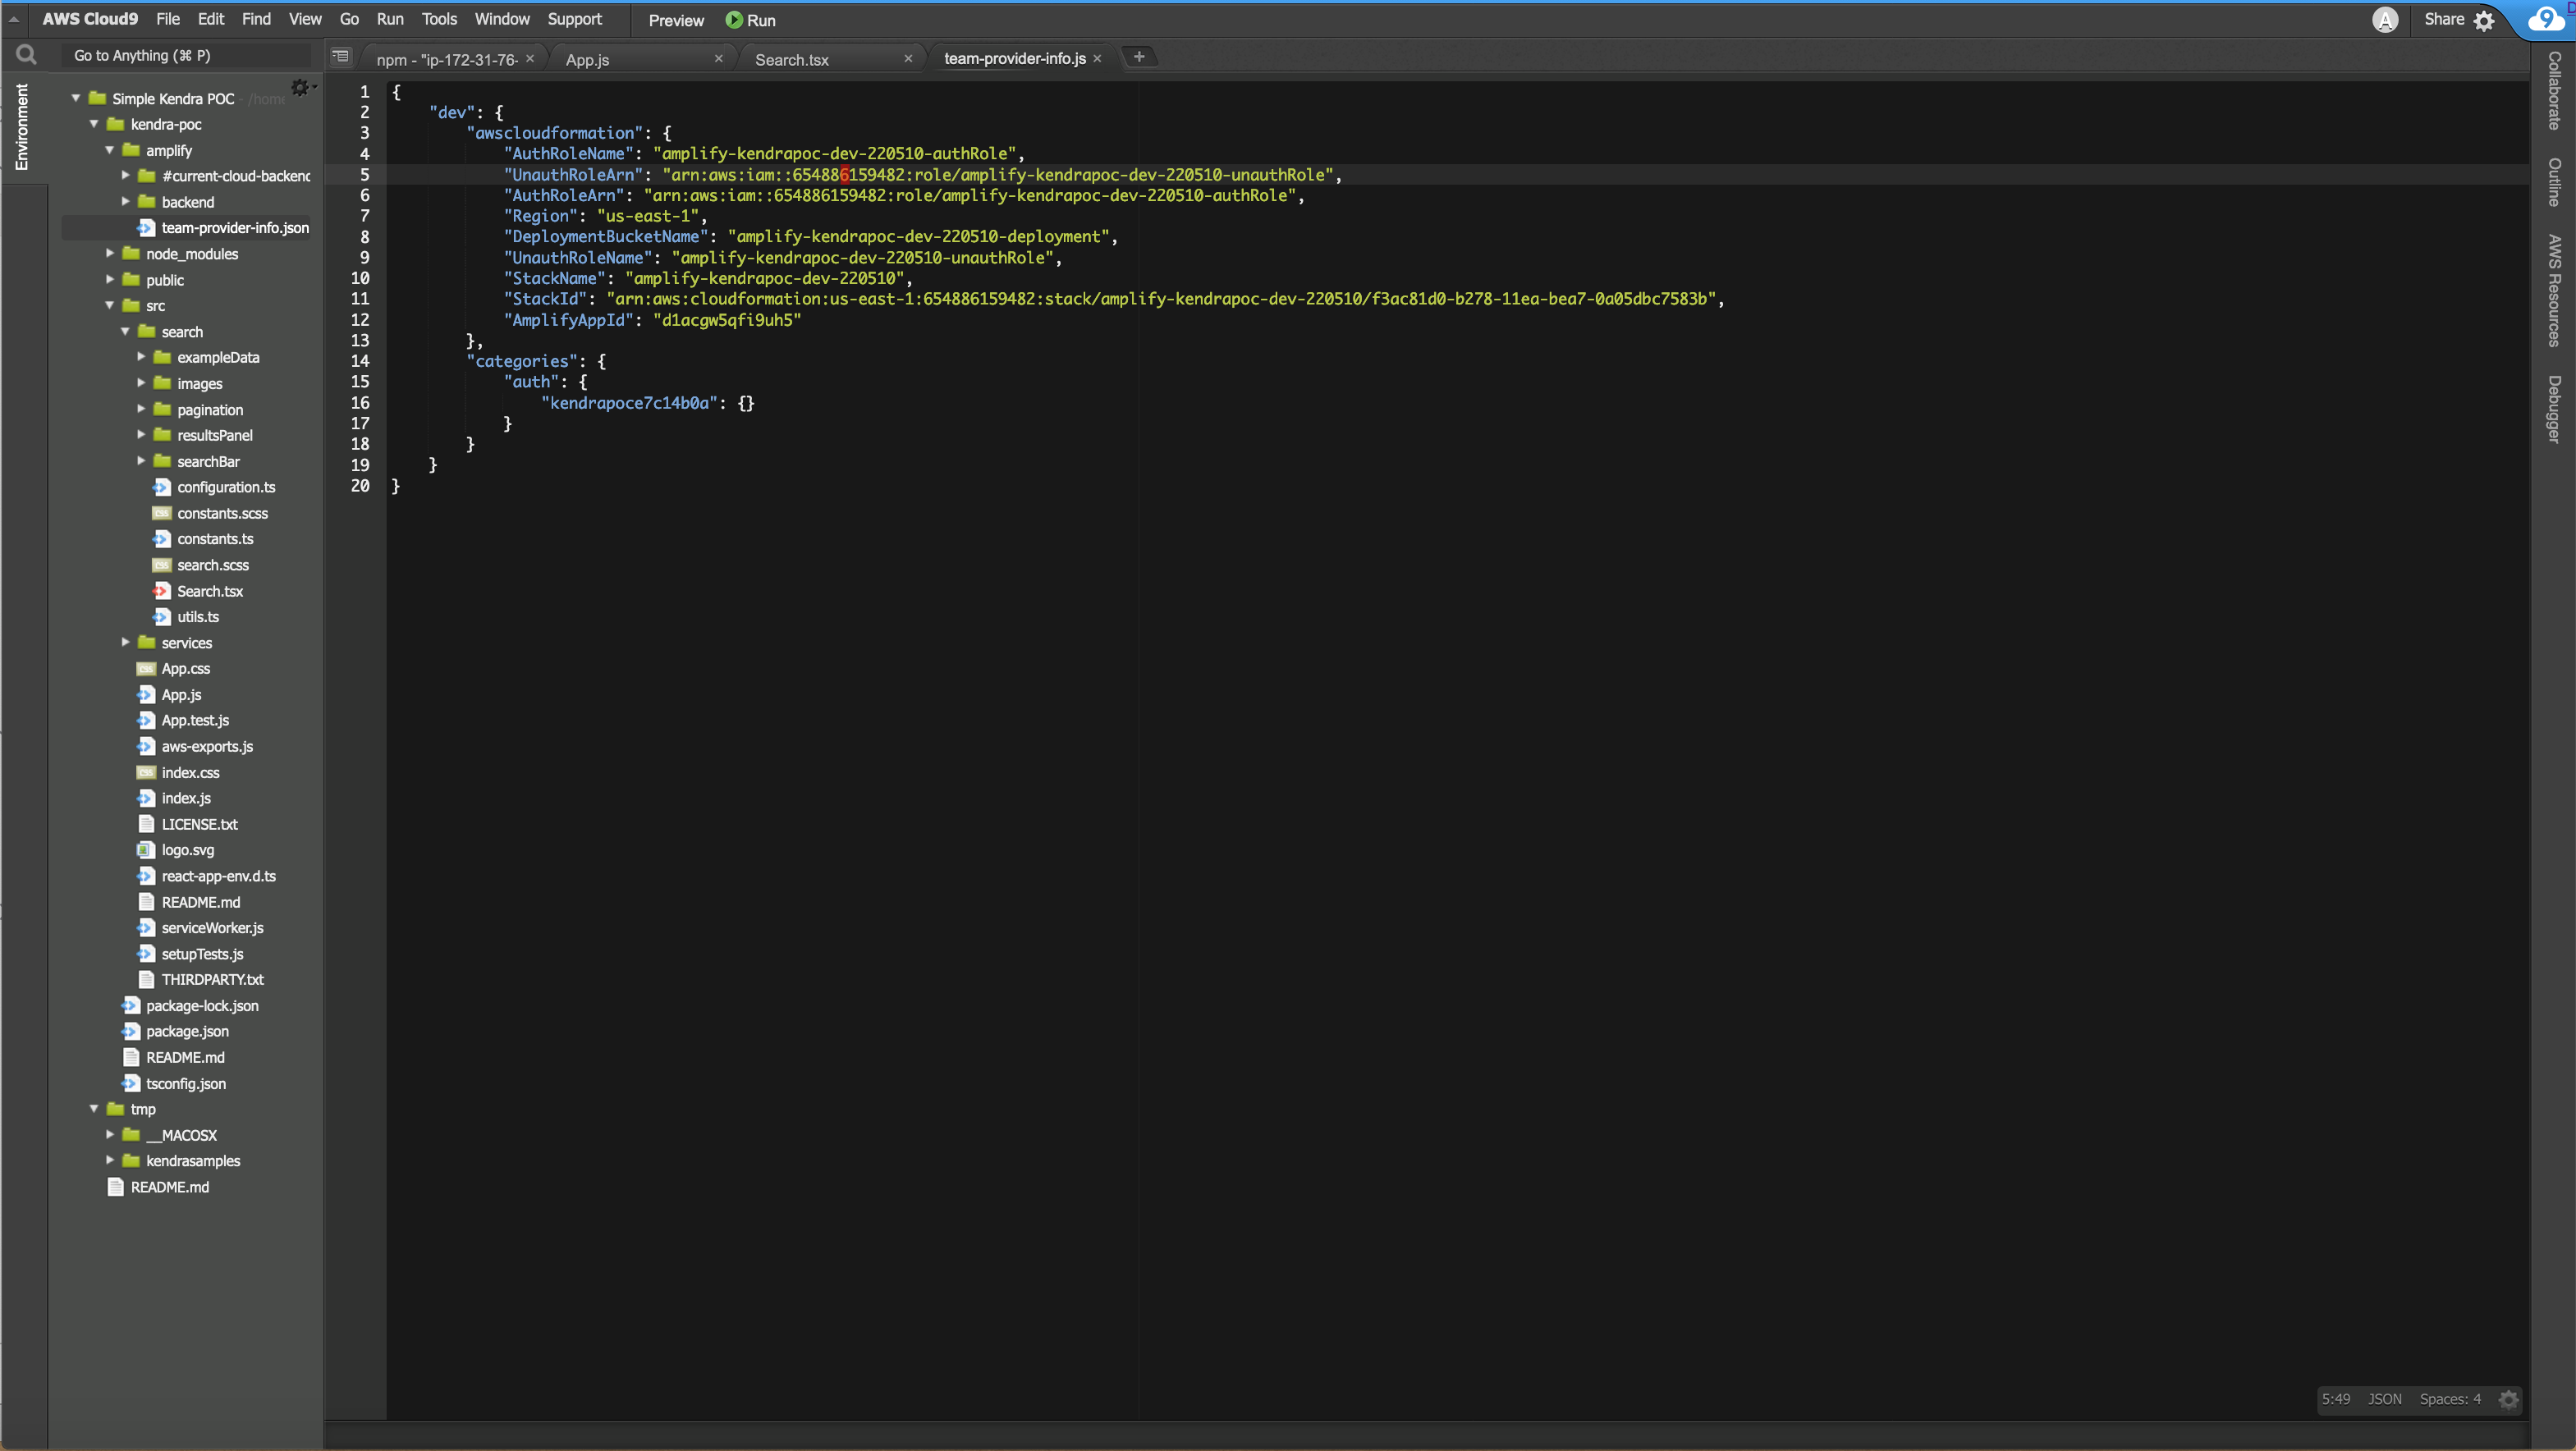
In the Cloud9 IDE in the left panel browse to the file kendra-poc/amplify/team-provider-info.json and open it by double clicking. Note the values of “AuthRoleArn” and “UnauthRoleArn”. This will look like the following image:
-
In the Cloud9 IDE in the left panel browse to the file kendra-poc/src/aws-exports.js. Note the value of “aws_cognito_identity_pool_id”.
-
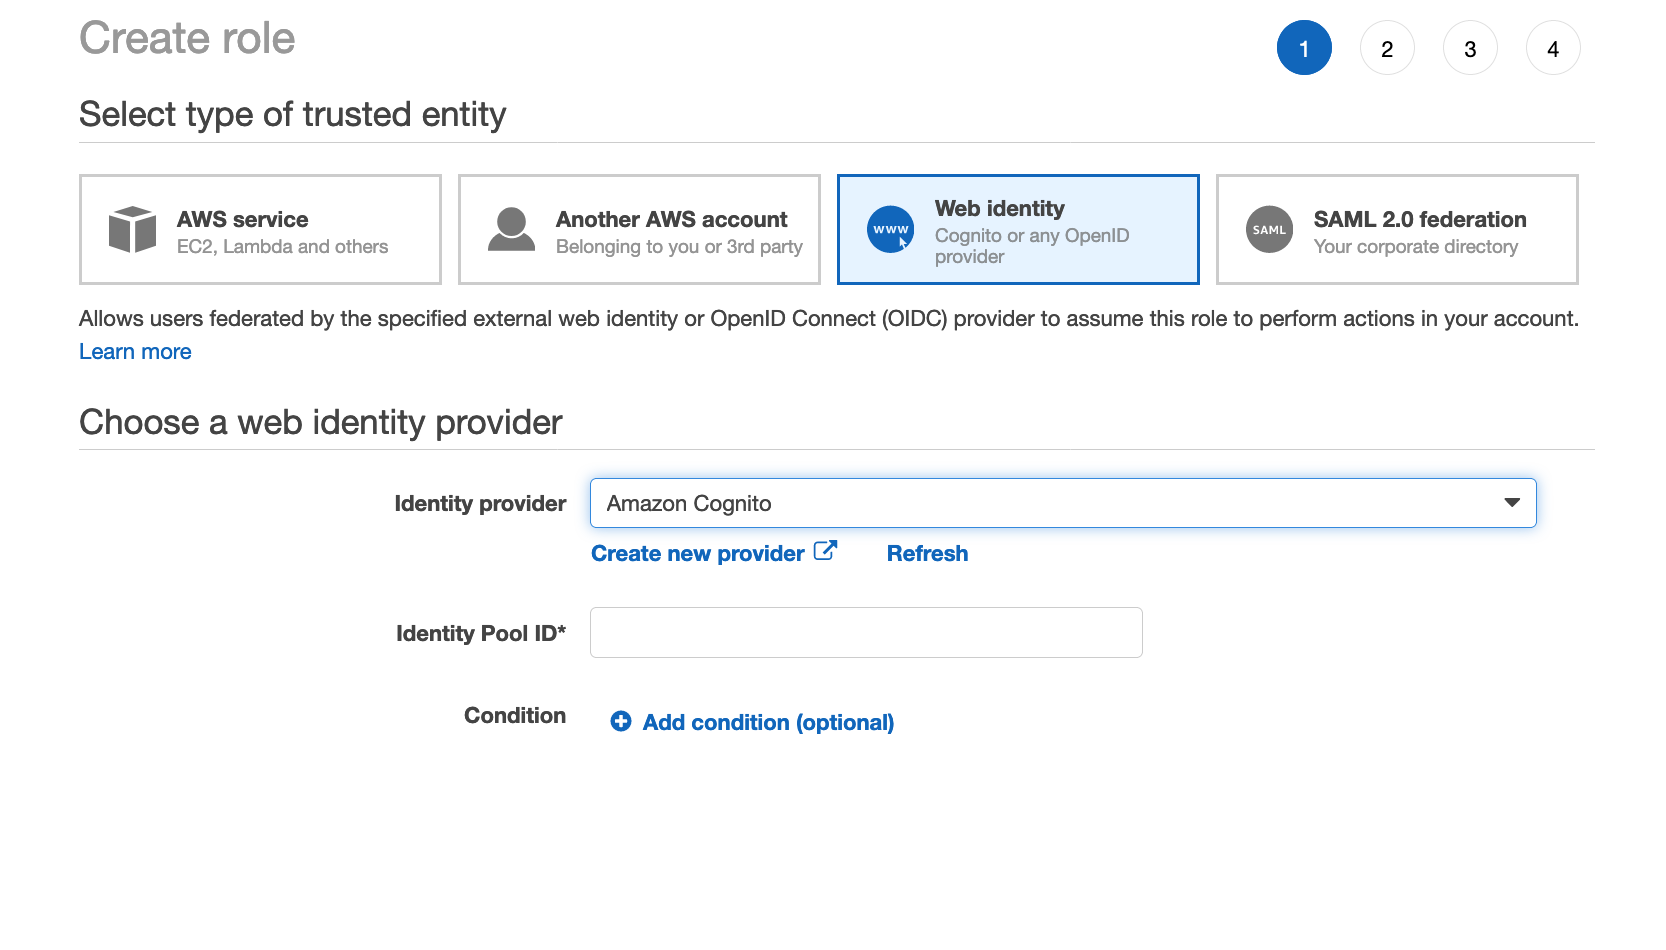
Open AWS Console for IAM and click on roles. Click on Create role. Select type of trusted entity to be Web identity and choose Identity provider to be Amazon Cognito. Fill the value of Identity Pool ID noted from the previous step. Click on Next Permissions.
-
Click on Create Policy. Click on JSON tab. Replace the contents with the policy below. Replace kendra-poc-ds-UNIQUE-SUFFIX with the name of the S3 bucket that is configured as the data-source (leave the * after the bucket name, which allows the policy to access any object in the bucket), replace ACCOUNT-NUMBER with the AWS account number and the KENDRA-INDEX-ID with the index id of your index. Click on Review policy. Give the policy a name such as my-kendra-auth-policy and click Create policy.
{
    "Version": "2012-10-17",
    "Statement": [
        {
            "Action": [
                "kendra:DescribeIndex",
                "kendra:SubmitFeedback",
                "kendra:ListDataSources",
                "kendra:Query"
            ],
            "Effect": "Allow",
            "Resource": [
                "arn:aws:kendra:us-east-1:ACCOUNT-NUMBER:index/KENDRA-INDEX-ID"
            ]
        },
        {
            "Action": [
                "s3:GetObject"
            ],
            "Effect": "Allow",
            "Resource": [
                "arn:aws:s3:::kendra-poc-ds-UNIQUE-SUFFIX*"
            ]
        }
    ]
}
-
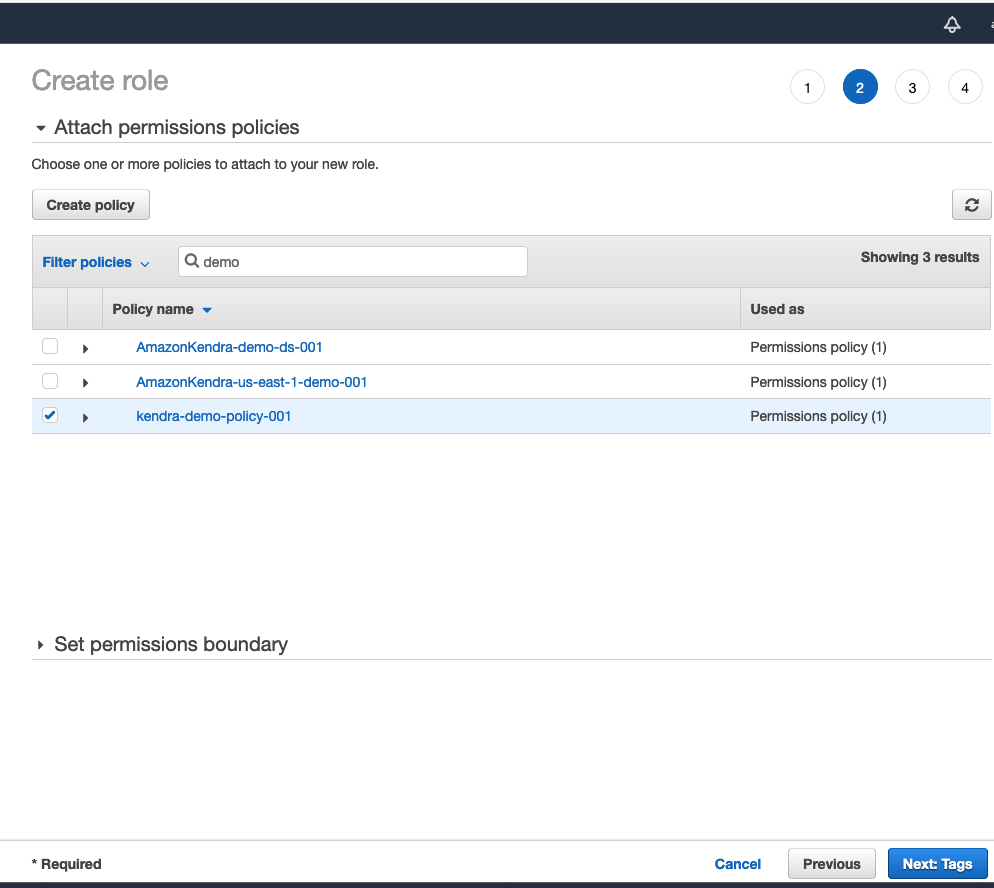
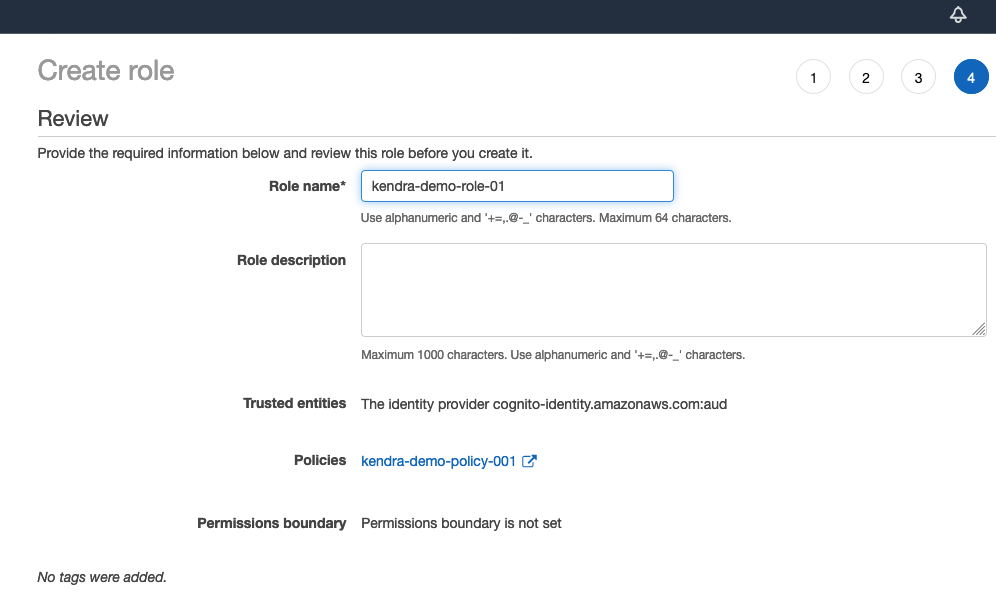
Browse back to the role creation tab of the browser. Search for the policy you just created and selct it. Click Next tags. Click Next: Preview and give the role a name such as TC-Kendra-Role.
-
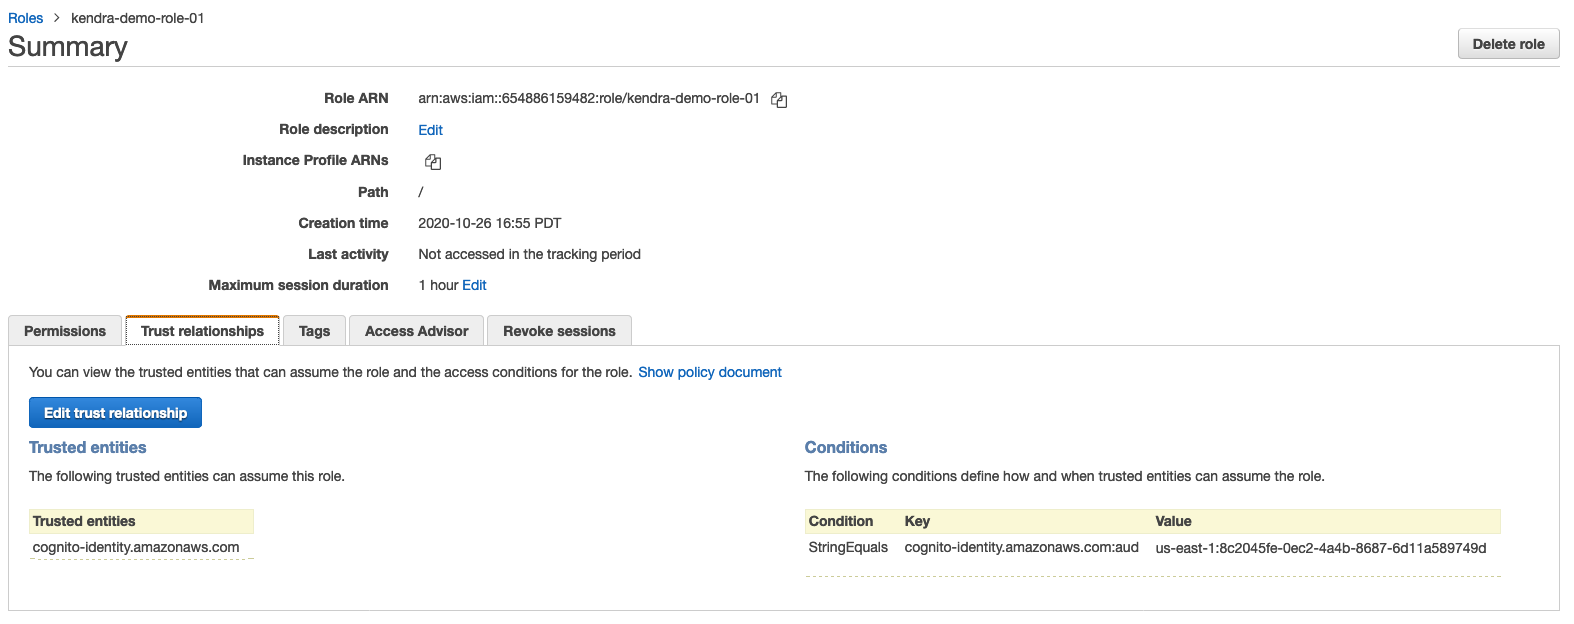
In the IAM Console click on roles and browse to the role just created. Note the Role ARN. Confirm that the policy is correctly attached
-
Click on the Trust Relationships tab and then press Edit trust relationships to edit the Trust Relationships
-
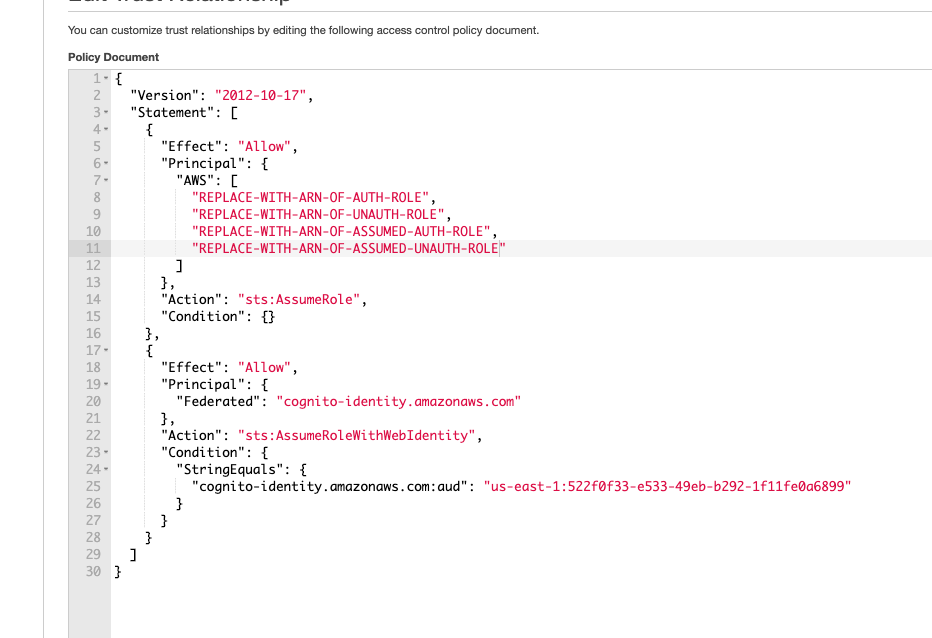
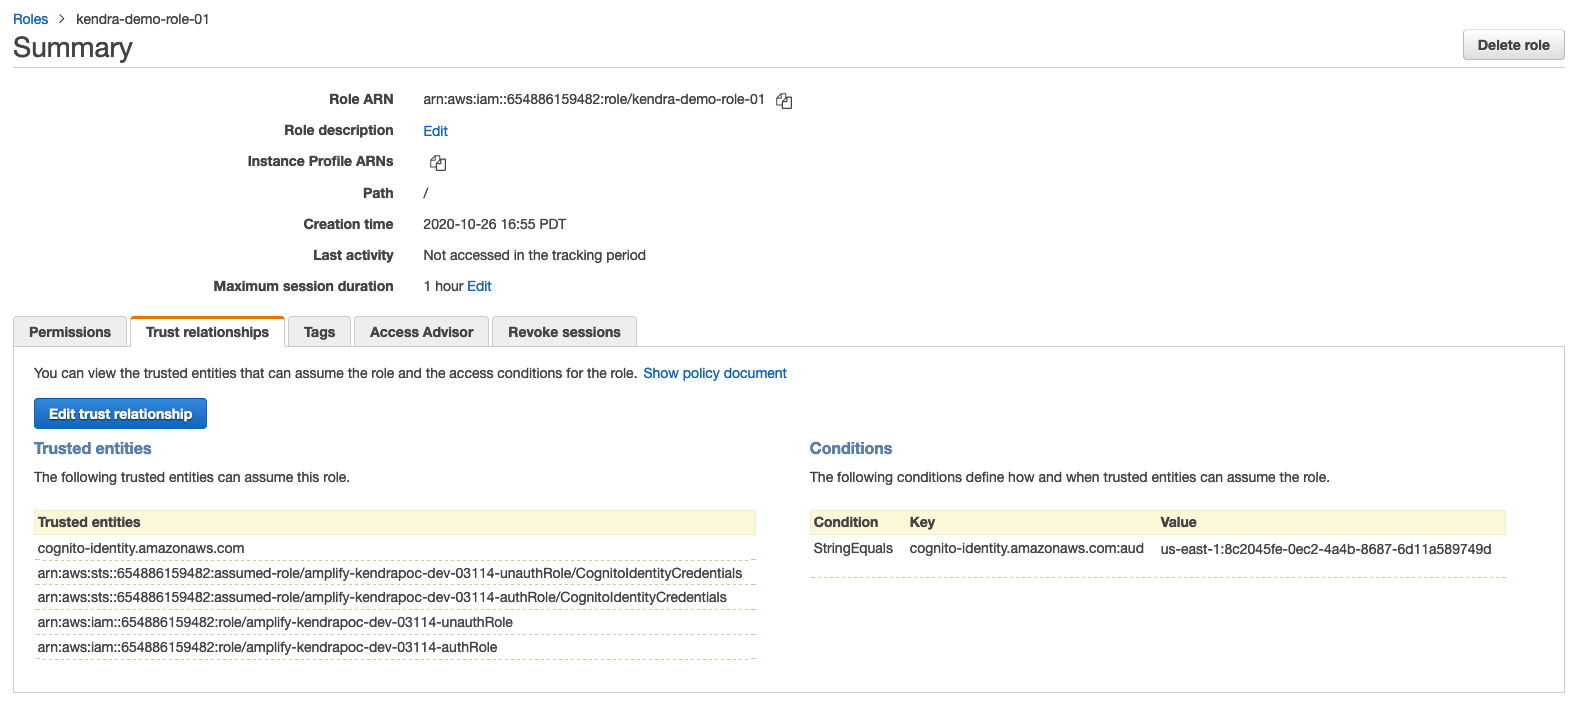
Edit the trust policy document and add the following permissions to the cognito auth and unauth roles. Note that for the first two lines, you can copy paste the auth and unauth roles copied in step 1. For the next two lines there is a need to make edits to the arns. Carefully note the screenshots illustrating thiese steps below. After the edits, press update policy.
    {
      "Effect": "Allow",
      "Principal": {
        "AWS": [
          "REPLACE-WITH-ARN-OF-AUTH-ROLE",
          "REPLACE-WITH-ARN-OF-UNAUTH-ROLE",
          "REPLACE-WITH-ARN-OF-ASSUMED-AUTH-ROLE",
          "REPLACE-WITH-ARN-OF-ASSUMED-UNAUTH-ROLE"
        ]
      },
      "Action": "sts:AssumeRole",
      "Condition": {}
    }

Complete the App
-
In the file browser part of Cloud9 environment browse to the file kendra-poc/src/App.tsx and open it for editing. Replace REPLACE-WITH-ARN-FOR-TEMP-CRED-ROLE-FOR-KENDRA with the ARN of the role defined in the previous step and replace “REPLACE-WITH-YOUR-INDEX-ID” with your Kendra index id.
-
Create user accounts (patricia - customer, james - AWS-Sales, john - AWS-Marketing, mary - AWS-SA) and put them in corrsponding groups by running the following at the command prompt:
USER_POOL_ID=`grep user_pools_id src/aws-exports.js| awk 'BEGIN {FS ="\"" } {print $4}'`
aws cognito-idp create-group --group-name customer --user-pool-id $USER_POOL_ID
aws cognito-idp create-group --group-name AWS-Sales --user-pool-id $USER_POOL_ID
aws cognito-idp create-group --group-name AWS-Marketing --user-pool-id $USER_POOL_ID
aws cognito-idp create-group --group-name AWS-SA --user-pool-id $USER_POOL_ID
aws cognito-idp admin-create-user --user-pool-id $USER_POOL_ID --username patricia --temporary-password AmazonKendra
aws cognito-idp admin-create-user --user-pool-id $USER_POOL_ID --username james  --temporary-password AmazonKendra
aws cognito-idp admin-create-user --user-pool-id $USER_POOL_ID --username john  --temporary-password AmazonKendra
aws cognito-idp admin-create-user --user-pool-id $USER_POOL_ID --username mary  --temporary-password AmazonKendra
aws cognito-idp admin-add-user-to-group --user-pool-id $USER_POOL_ID --username patricia --group-name customer
aws cognito-idp admin-add-user-to-group --user-pool-id $USER_POOL_ID --username james --group-name AWS-Sales
aws cognito-idp admin-add-user-to-group --user-pool-id $USER_POOL_ID --username john --group-name AWS-Marketing
aws cognito-idp admin-add-user-to-group --user-pool-id $USER_POOL_ID --username mary --group-name AWS-SA
- Enable unauthenticated access in the Cognito Identity Pool as our application supports guest access by running the following commands
ID_POOL_ID=`grep identity_pool_id src/aws-exports.js| awk 'BEGIN {FS ="\"" } {print $4}'`
ID_POOL_NAME=`aws cognito-identity describe-identity-pool --identity-pool-id $ID_POOL_ID | grep IdentityPoolName | awk 'BEGIN {FS ="\"" } {print $4}'`
aws cognito-identity update-identity-pool --identity-pool-id $ID_POOL_ID --identity-pool-name $ID_POOL_NAME --allow-unauthenticated-identities
- Start the application in the Cloud9 environment by typing the following command in the command window in the ~/environment/kendra-poc directory:
npm start
This will take a few minutes to compile the code and start.
-
Preview the running application by clicking on Preview in the Cloud9 menu bar and selecting Preview Running Application from the pull down menu. This will open a browser window and look as below:
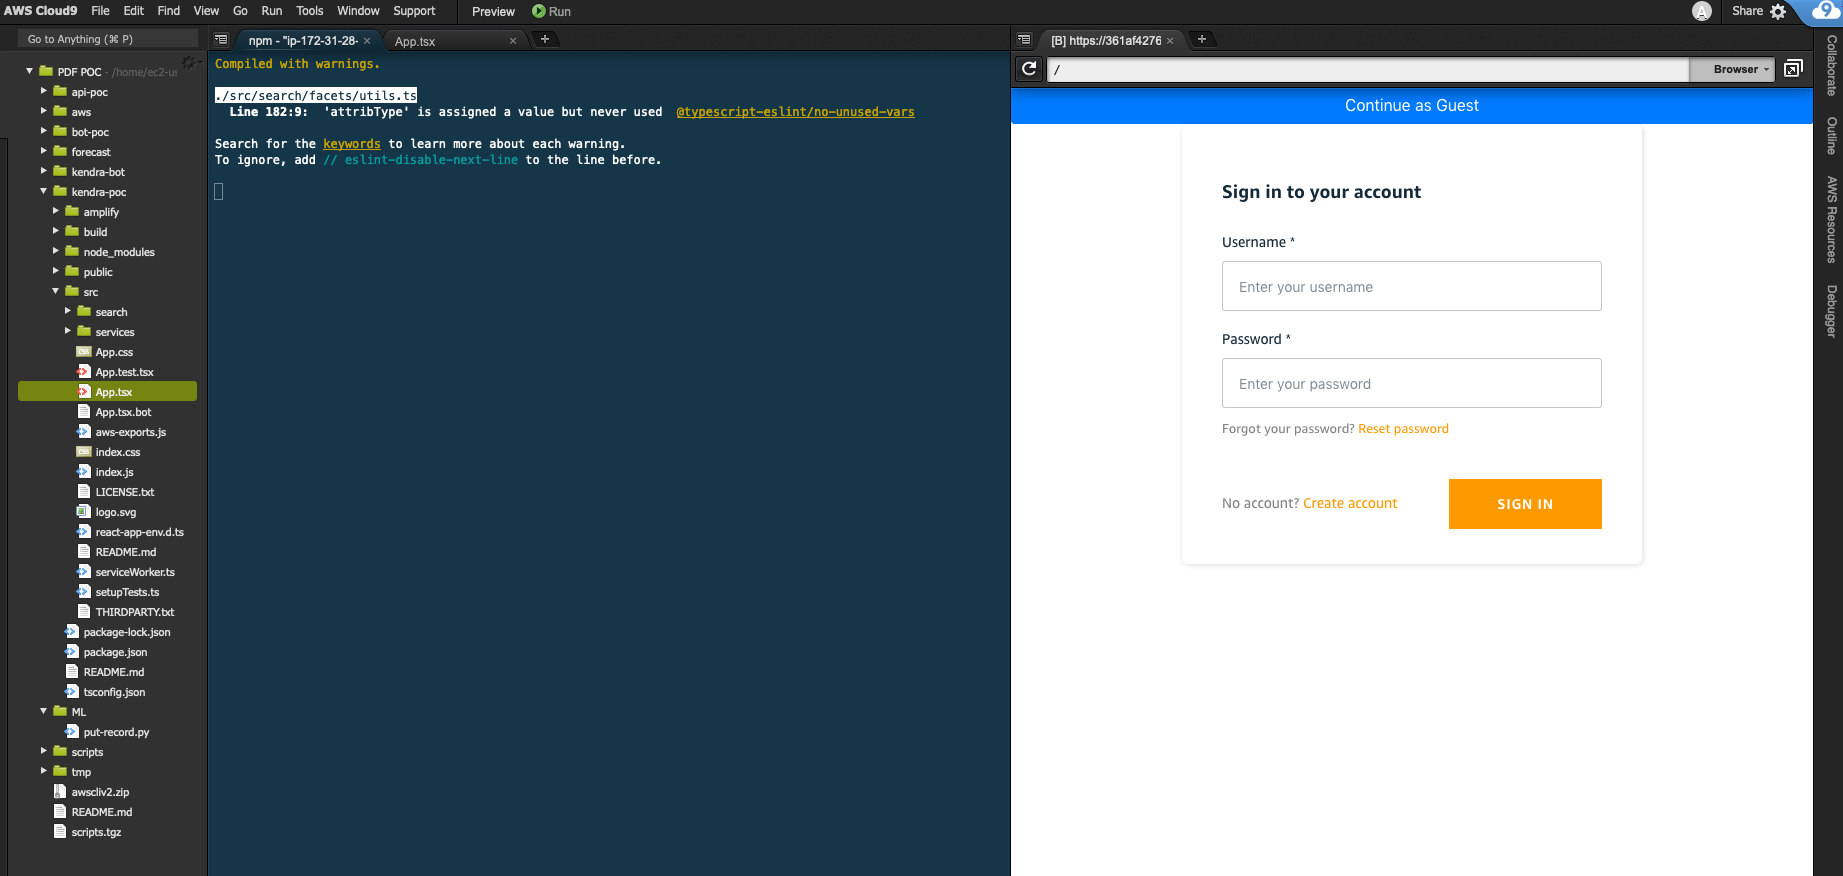
-
You can now login with any of the users we configured above (patricia, james, john, mary) with the temporary password AmazonKendra. Cognito will force password reset on first login. It is recommended to do this step before trying out guest access.
Use the App
Now we will try out the app we have developed by making a few search queries for different users.
In order to experience how access control works, issue the same query from a few suggested below from different user accounts and notice the difference in the search results. For patricia (customer), the results contain blogs and user guides, for james (Sales) the results contain blogs, user guides and case studies, for john (Marketing) the results contain blogs, user guides, case studies and the analyst reports; while for mary (Solutions Architect) the results contain blogs, user guides, case studies, analyst reports as well as white papers. For guests or anonymous users, the results contain only blogs. Feel free to also issue other queries and make observations.
Suggested Queries
- What is machine learning?
- What is serverless?
- Databases